Set up WebDriver
- Download eclipse: http://www.eclipse.org/downloads/
- Download JDK http://www.oracle.com/technetwork/java/javase/downloads/jdk8-downloads-2133151.html
- Set up jdk path (Save jdk and jre C:\Program Files\Java inside this folder)
- Open eclipse
- Create a project , File-> New ->Java Project in Eclipse
- File->Properties->Java Build Patha->Add library -> JRE in eclipse
- Setup TestNg For the Eclipse plug-in, we suggest using the update site:
- Select Help / Software updates / Find and Install.
- Search for new features to install.
- New remote site.
- For Eclipse 3.4 and above, enter http://beust.com/eclipse.
- For Eclipse 3.3 and below, enter http://beust.com/eclipse1.
- Make sure the check box next to URL is checked and click Next.
- Eclipse will then guide you through the process.
4. Restart Eclipse and select the menu Window / Show View / Other... and you should see the TestNG view listed in the Java category.
5. Download webDirver: http://seleniumhq.org/download/
6. Unzipped downloaded file in specific folder
7. Put all downloaded .jar (webDriver+testNg) in eclipse project as external .jar file (steps are in below)
a. Create a project in eclipse: File->New->Project-> Select (java project)->Give name (sample1)
b.
Click on Finish button
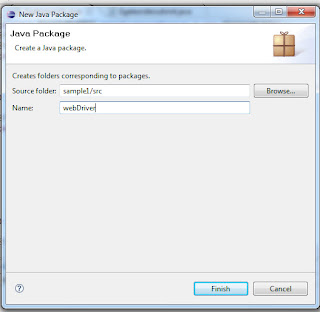
c. Create package under src folder. Give name (webDriver)
d.
Click on Finish button
e. Create class under this package
f. Right click on project name select Properties-> Java build Path->Libraries-> Add External JARs-> (Add webDriver jar files from specific location)->Click on Open
g.
h. Repeat step f for add tesNg .jar file from http://search.maven.org/#search%7Cga%7C1%7Ca%3A%22testng%22 here and then add this jar file as external jar file in eclipse.


No comments:
Post a Comment